Michael Woods Blog

January 27, 2012

BAM EventBus Service Errors and Warnings

Filed under: Uncategorized — Michael Woods @ 2:49 PM

We started getting the following BAM warnings and errors in the event viewer every time our BizTalk application received a transaction.

Event Type:        Warning

Event Source:        BAM EventBus Service

Description:

Execute batch error. Exception information: TDDS failed to batch execution of streams. SQLServer: ServerName, Database: BAMPrimaryImport.Parameter is not valid.

 Event Type:        Error

Event Source:        BAM EventBus Service

Description:

Execute event error. Error(s) occurred while executing events, see TDDS_FailedTrackingData table for more details. SQLServer: ServerName, Database: BAMPrimaryImport.

 The BAMPrimaryImport.dbo.Bam_Metadata_TrackingProfiles table logged the following errors:

  • TDDS failed to execute event. Could not find stored procedure ‘dbo.bam_PartsInvoice_PrimaryImport’.
  • TDDS failed to execute event. Could not find stored procedure ‘dbo.bam_PartsInvoice_EnableContinuation’.
  • TDDS failed to execute event. Could not find stored procedure ‘dbo.bam_PartsInvoice_AddRelationship’. Could not find stored procedure ‘dbo.bam_PartsInvoice_PrimaryImport’.
  • TDDS failed to execute event. Parameter is not valid.
  • TDDS failed to execute event. Parameter is not valid.
  • TDDS failed to execute event. Could not find stored procedure ‘dbo.bam_PartsInvoice_PrimaryImport’.

 Solution 1: (Supported by Microsoft – Didn’t work for us)

It appears that we have orphaned tracking profiles that are still trying to log information for an old activity that was deleted. I tried the suggested fix from Microsoft on How to Remove Orphaned Tracking Profiles which entails the following steps:

  • Re-deploy the activity using the command line (bm.exe deploy-all -DefinitionFile:OldDefinitionForActivity.xlsx).
  • Open the Tracking Profile Editor go to File -> ImportBAM Activity Definition.
  • Locate the BAM activity definition name that matches the name associated with the errors in the Bam_metadata_TrackingProfiles table.
  • Check the Retrieve the current tracking settings for this activity definition check box.
  • Once the activity loads go to Tools -> Remove Tracking Profile
  • Delete the activity using the command line (bm.exe remove-all -DefinitionFile:OldDefinitionForActivity.xlsx).

 This didn’t fix our problems, we continued to get same TDDS failed to execute event errors.

 Solution 2: (NOT Supported by Microsoft – Didn’t try this one)

I found a fix in the Pro Business Activity Monitoring in BizTalk 2009 book by Apress that comes with a warning that it can void Microsoft support for your BizTalk environment. Microsoft has a blanket statement that if you manipulate the BizTalk databases they are not obligated to support them. The book suggest truncating all data from the following tables:

  • BizTalkMgmtDB.dbo.BAM_TrackingProfiles
  • BizTalkMgmtDB.dbo.BAM_TrackPoints
  • BizTalkMgmtDB.dbo.StaticTrackingInfo
  • BAMPrimaryImport.dbo.BAM_Metadata_TrackingProfiles
  • BAMPrimaryImport.dbo.BAM_Metadata_Annotations

I’m not a big fan of this approach since it would require you to redeploy all tracking profiles and also go into the BizTalk Admin Console and enable/disable tracking on all ports, pipelines, and orchestrations. Blowing away all of the data in these tables seems a little excessive and I believe it will cause more issues, so we didn’t try it.

 *Solution 3 (NOT Supported by Microsoft – Works!!!)

I didn’t want to do it this way, but with the limited time and resources available to figure it out I ended up doing the following:

  • To be safe make a backup copy of the BAMPrimaryImport database before continuing.
  • Re-deploy the activity using the command line (bm.exe deploy-all -DefinitionFile:OldDefinitionForActivity.xlsx). This generates the stored procedures in the BAMPrimaryImport database.
  • Open SQL Profiler and start a trace with a filter for DatabaseName
    like
    BAMPrimaryImport. Do a search on all columns for the activity name, in my case it’s “PartsInvoice“. This will allow you to see the parameter names and data that is used to call the stored procedures.
  • Modify stored procedures in the BAMPrimaryImport database to use the same parameter names and data types that you see in SQL Profiler. Then replace everything between the BEGIN and END tag with a RETURN statement. This will allow the orphaned tracking profile to call the stored procedure, not throw a warning or exception, and it won’t log any of the unwanted data.

Here are the updated stored procedures that I used:

ALTER PROCEDURE [dbo].[bam_PartsInvoice_AddRelationship]

(        

@ActivityID NVARCHAR(128),

@ReferenceType NVARCHAR(128),

@ReferenceName NVARCHAR(128),

@ReferenceData NVARCHAR(1024),

@LongReferenceData NTEXT

)

AS

BEGIN

RETURN 1;

END

_____________________________________

ALTER PROCEDURE [dbo].[bam_PartsInvoice_EnableContinuation]

(

@ParentActivityID NVARCHAR(128),

@ContinuationToken NVARCHAR(128)

)        

AS

BEGIN

RETURN 1;

END

_____________________________________

ALTER PROCEDURE [dbo].[bam_PartsInvoice_PrimaryImport]

(        

@ActivityID NVARCHAR(128)=NULL,

@IsStartNew BIT,

@IsComplete BIT,

@PassedValidation DATETIME = NULL,

@FailedValidation DATETIME = NULL,

@Vendor NVARCHAR (50) = TEST,

@PO$Number NVARCHAR (50) = TEST,

@Invoice$Number NVARCHAR(128)=NULL,

@InvoiceReceived DATETIME = NULL,

@InvoiceProcessed DATETIME = NULL,

@InvoiceAmount FLOAT = 1.00,

@TotalInvoiceAmount FLOAT = 1.00        

)

AS

BEGIN

RETURN;

END

November 18, 2011

How to Install BizTalk 2010 ESB Toolkit 2.1

Download ESB Toolkit 2.1

http://www.microsoft.com/download/en/details.aspx?id=11847

Open the file: BizTalk ESB Toolkit 2.1-x64.msi

Click ‘Run’


Click ‘Next’


Select ‘I accept the terms in the License Agreement’. Click ‘Next’


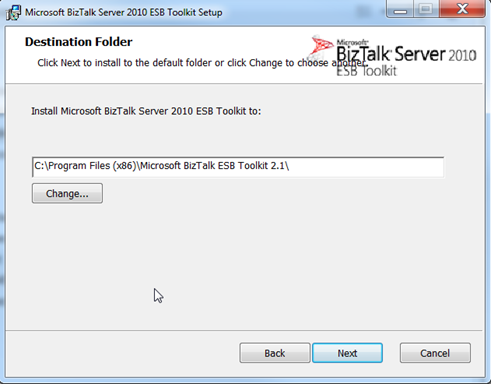
Accept the default installation location and click ‘Next’


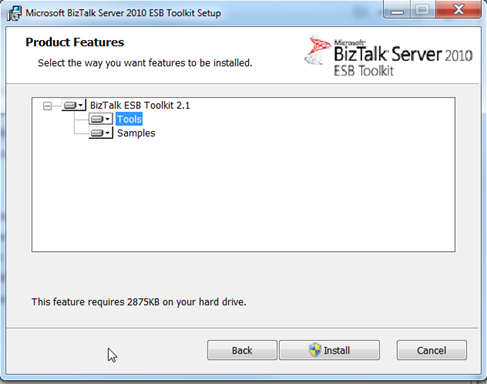
Click ‘Install’


Will see a status screen with a progress bar.


Click ‘Finish’


Run the ESB Configuration Tool as administrator


Select the ‘Enable Exception Management Database’ checkbox. Enter the

name of the SQL Server that will host the EsbException database. Enter the

BizTalk Admin Group name, which is the domain BizTalk Server Administrators

group. Then enter the BizTalk App Group name, which is the domain BizTalk

Application Users group.


Select the ‘Enable Exception Services’ checkbox and enter the credentials for

the service account used for the BizTalk Isolated Host Instance. Select the IIS

website that is going to be used and select the two checkboxes for ‘Enable

Handling Services ASMX and WCF.


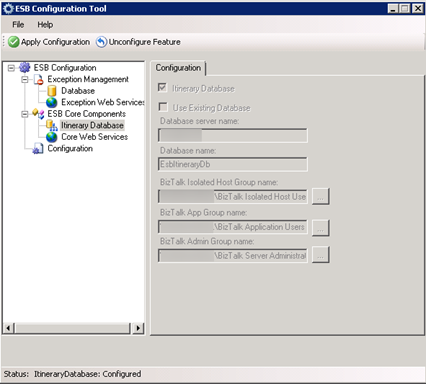
Select the ‘Itinerary Database’ and enter the name of the SQL Server that will

host the EsbItineraryDb database. Enter the domain group names for the

BizTalk Isolated Host Group, BizTalk App Group, and BizTalk Admin Group.


Select ‘Enable Core Services’ and enter the credentials for the service account

used for the BizTalk Isolated Host Instance. Enter the domain group name for

the BizTalk Isolated Host Users. Select the website to deploy the ESB web

services to. Select the checkboxes for ‘Transformation Services’, ‘Resolution

Services’, ‘Operation Services’, and ‘Itinerary Services’.


Select ‘SSO Configuration Source’. Enter the name of the server running the

Enterprise Single Sign-On Master Secret Server. Enter the location of the

config file (C:\Program Files (x86)\Microsoft BizTalk ESB Toolkit 2.1\Bin

\EsbConfigurationTool.exe.Config). Enter a contact email address. Enter the

domain group for the SSO Administrators. Enter the domain group name for

the BizTalk Application Users. Click ‘Apply Configuration’ at the top.

After everything is configured you still need to install the applications and GAC the dlls.

Install Applications

Execute the Microsoft.Practices.ESB.CORE_NOBINDING64.msi file located here:

C:\Program Files (x86)\Microsoft BizTalk ESB Toolkit 2.1\

Microsoft.Practices.ESB.CORE_NOBINDING64.msi

This installs the Microsoft.Practices.ESB application in the BizTalk Server Administration Console


Now you need to import the bindings to create the Receive Ports, Receive Locations,

Send Ports, and Orchestration bindings.

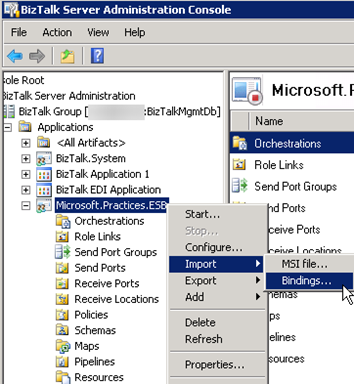
Right click on the Microsoft.Practices.ESB -> Import -> Bindings

Select the bindings located here:

C:\Program Files (x86)\Microsoft BizTalk ESB Toolkit 2.1\

Bindings\Microsoft.Practices.ESB.CORE_Bindings.xml

Note: The bindings have trust set to false for all of the host instances. You might

need to modify the bindings before importing them to avoid this error.


Execute the Microsoft.Practices.ESB.Exceptionhandling_NOBINDING64.msi file located here:

C:\Program Files (x86)\Microsoft BizTalk ESB Toolkit 2.1\

Microsoft.Practices.ESB.ExceptionHandling_NOBINDING64.msi

This will add the exception handling resources to the Microsoft.Practices.ESB BizTalk application.


Now you need to import the bindings to create the Receive Ports, Receive Locations

and Send Ports for exception handling.

Right click on the Microsoft.Practices.ESB -> Import -> Bindings.

Select the bindings located here:

C:\Program Files (x86)\Microsoft BizTalk ESB Toolkit 2.1\

Bindings\Microsoft.Practices.ESB.ExceptionHandling_Bindings.xml

Note: The bindings have trust set to false for all of the host instances. You might

need to modify the bindings before importing them to avoid this error.


Open a command prompt with administrative privileges.


Next you need to install the DLLs from the ESB.CORE and ESB.ExceptionHandling

packages into the GAC. Execute the two following commands:

msiexec.exe /qn /i “C:\Program Files (x86)\Microsoft BizTalk ESB Toolkit 2.1\Microsoft.Practices.ESB.CORE_NOBINDING64.msi”

msiexec.exe /qn /i “C:\Program Files (x86)\Microsoft BizTalk ESB Toolkit 2.1\Microsoft.Practices.ESB.ExceptionHandling64.msi”


Go to Start ->Run -> Type ‘C:\Windows\Assembly’ -> Press Enter

Verify that the Microsoft.Practices.ESB DLLs are in fact installed in the GAC


TODO:

Installing the JMS/WMQ Components

Installing the ESB Management Portal

Installing the ESB Management Portal Alert Service

Installing the ESB Management Portal UDDI Publishing Service


How to Install SSL Certificates and Enable HTTPS in IIS7

Filed under: Certificates, IIS — Tags: , , , , — Michael Woods @ 10:11 AM

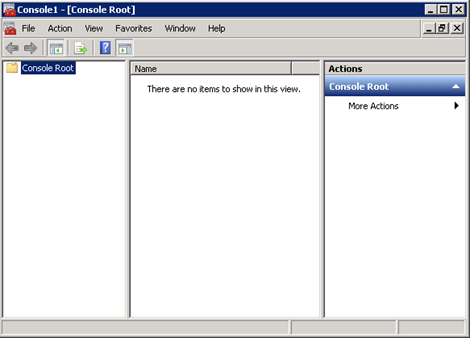
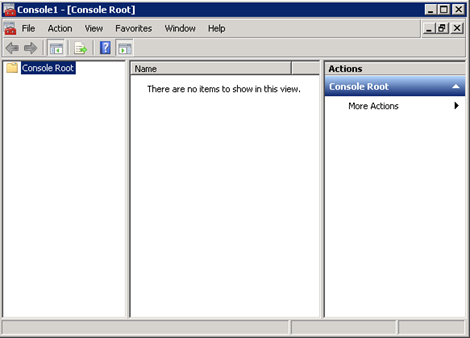
Open the Microsoft Management Console

Start -> Run -> Type MMC


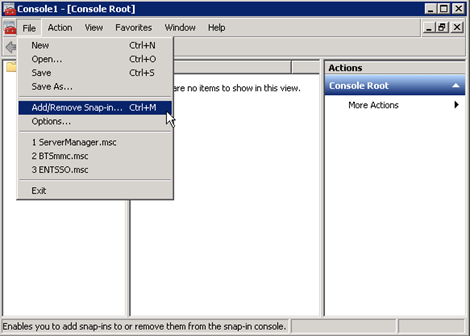
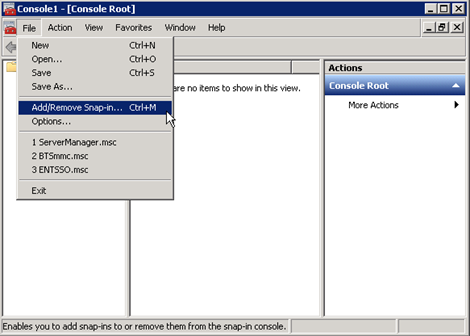
File -> Add/Remove Snap-in


Select ‘Certificates’. Click ‘Add’. Click ‘Ok’


Select ‘Computer account’ and click ‘Next’


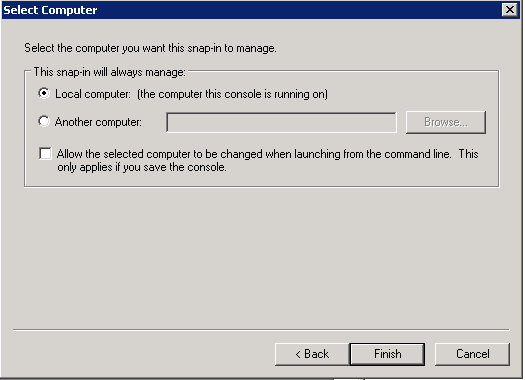
Select ‘Local computer’ and click ‘Finish’


Certificates (Local Computer) -> Personal -> Certificates -> (Right click -> All Tasks -> Import)


Click ‘Next’


Browse to the .pfx (Personal Information Exchange) file and click ‘Next’


Note: if you don’t see this screen to enter the password you need to stop right

here. The private key has to be included within the certificate for the certificate

to be usable for SSL. You can still install the certificate, but it won’t show up in

IIS when you try to select a certificate for signing.

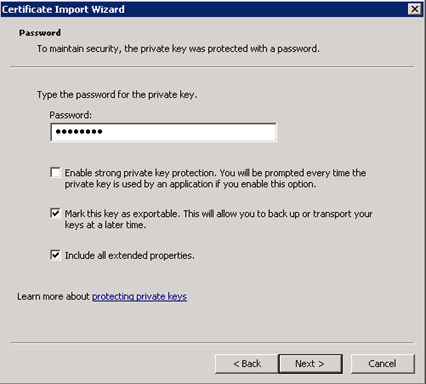
Enter the password and select the ‘Mark this key as exportable’ and

‘Include all extended properties’. Click ‘Next’


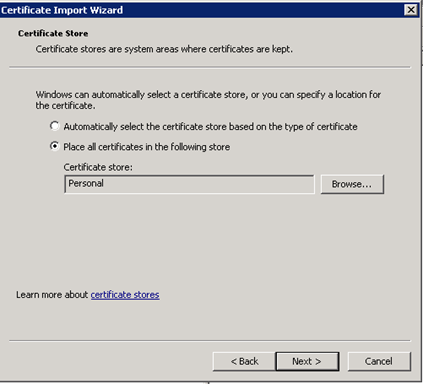
Select the ‘Personal’ certificate store and click ‘Next’


Click ‘Finish’


Click ‘Ok’


Verify that the certificates were imported


The certificate should now show up in IIS

File -> Add/Remove Snap-in


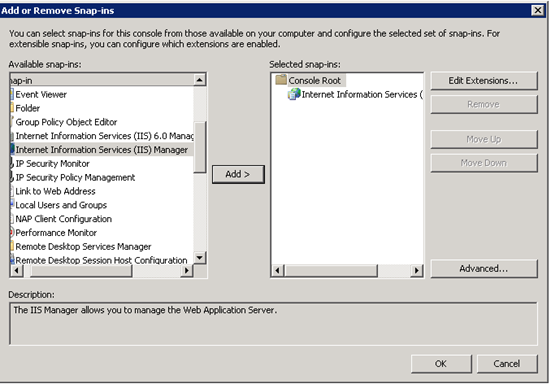
Select ‘Internet Information Services (IIS) Manager’. Click ‘Add’. Click ‘Ok’


Open ‘Server Certificates’


Notice that the certificate you installed shows up in the list. If it doesn’t show up,

make sure the certificate contains a private key.


Now we are ready to setup HTTPS

Right click ‘Default Web Site’ and click ‘Edit Bindings’


Click ‘Add’


Select https and enter the port (Default 443), host name, and pick the SSL certificate.

Note that this example is using a wildcard certificate, so the host name has to use the

same domain name as the certificate of you will get certificate domain mismatch errors

when trying to visit the site. Click ‘Ok’


Verify that the https bindings are added to the site bindings list.


Important:

After creating the bindings entry in IIS you need to create the DNS entry to

allow other machines on the network to resolve the host name.

How to Configure BizTalk Server 2010 to use Certificates

Filed under: BizTalk, Certificates — Tags: , — Michael Woods @ 9:57 AM

Follow these steps to configure BizTalk to use an installed certificate for encryption,

decryption, and communication validation of external systems.

Open the BizTalk Server Administration Console


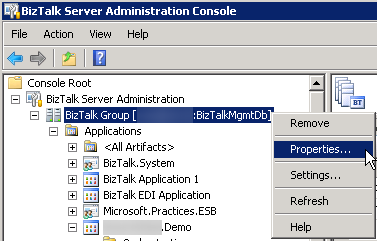
Right click on the BizTalk Group that needs to be configured and select ‘Properties’


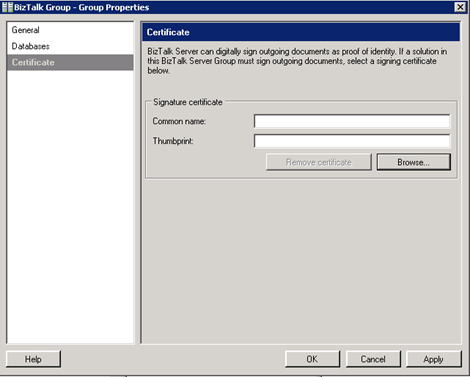
Click ‘Certificate’ on the left pane


Click ‘Browse’ to pick a certificate


Select the certificate that is for your domain. If your certificate doesn’t show up,

follow the instructions in my previous post ‘How to Install Certificates for

BizTalk Service Accounts’.


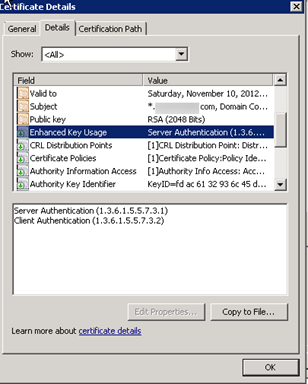
Make sure that the certificate contains the Server Authentication and Client

Authentication attributes under Enhanced Key usage


Click ‘Ok’

How to Install Certificates for BizTalk Service Accounts on Server 2008

Filed under: BizTalk, Certificates, Server 2008 — Tags: , , — Michael Woods @ 9:48 AM

The certificate has to be installed with the service account that it will be

running under. Add the service accounts to the administrators group on

the local machine. These are the service accounts that are being used by

the BizTalk host instances and isolated host instances. You also have to

install the certificates with user account that will configure BizTalk to use certificates.


Note: The following steps need to be completed while logged in

locally as each service account and the BizTalk administrator that

will configure the certificate for use in BizTalk.

Login using the service account


Confirm that you are logged in as the service account. It is easy to

mess up when logged into multiple remote desktop instances.


Locate the certificate to be installed (this one is a wild card certificate)


Open Internet Explorer -> Tools -> Internet Options -> Content Tab

Click ‘Certificates’ button


Navigate to the ‘Personal’ tab and click the ‘Import’ button to open

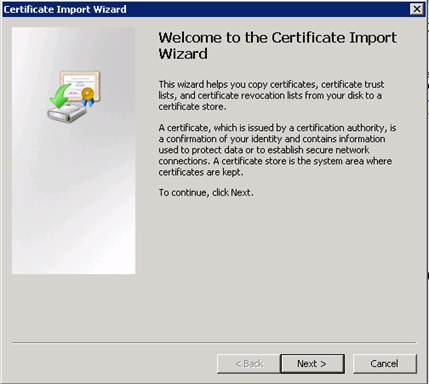
the certificate import wizard


Click ‘Next’


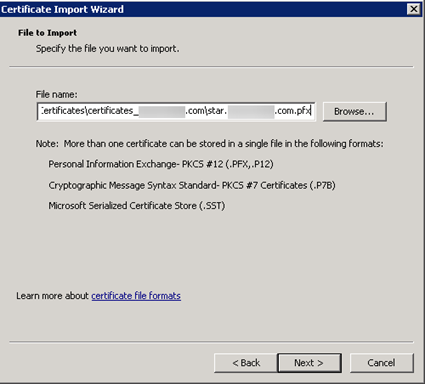
Browse to the certificate and click Next. You might have to select ‘Personal

Information Exchange’ from the drop down on the Browse menu to see the .pfx file.


Since the certificate includes the private key it will require a password to install.

Enter the password and check the ‘Mark this key as exportable’ checkbox. Click ‘Next’


Select the ‘Personal’ certificate store and click ‘Next’


Click ‘Finish’


Click ‘Ok’


Verify that the certificate was installed in the ‘Personal’ certificate store


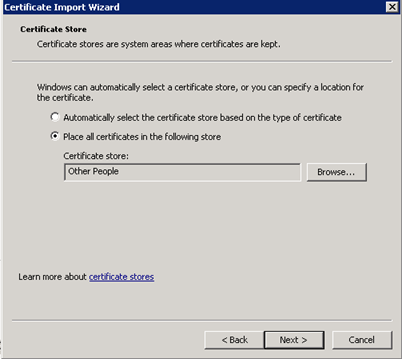
The certificate also needs to be installed into the ‘Other People’ certificate

store. Navigate to the ‘Other People’ tab and click the ‘Import’ button


Click ‘Next’


Browse to the certificate and click Next. You might have to select ‘Personal

Information Exchange’ from the drop down on the Browse menu to see the .pfx file.


Since the certificate includes the private key it will require a password to install.

Enter the password and check the ‘Mark this key as exportable’ checkbox. Click ‘Next’


Select the ‘Other People’ certificate store and click ‘Next’


Click ‘Finish’


Click ‘Ok’


Verify that the certificate shows up in the Other People certificate store.

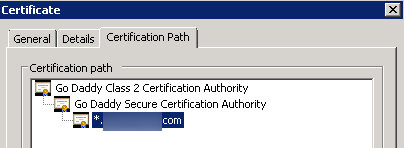
Note that the full certificate path is installed.


Double clicking the certificate will show the full certificate path.


Note: Make sure you complete these same steps for all service accounts

that are running BizTalk host instances that require the use of the certificate.

You will also need to install the certificates on the user account that will be

used to configure BizTalk. This account has to be in the BizTalk Administrators

group.

How to Configure Firewall to Fix BizTalk Enterprise Single Sign-On SSO Configuration Errors

When running the BizTalk Server Configuration utility I had issues

setting up the Enterprise SSO section. The errors made it seem like

the SSO service wasn’t running on the Master Secret Server. This is

a distributed system with BizTalk installed on Server_A and SQL Server

on Server_B. The SSO Database and Master Secret Server is installed

on Server_B. When running the BizTalk Server Configuration utility on

Server_A I received errors saying it can’t communicate with the

Enterprise SSO service. I followed Microsoft’s recommendation of

opening up TCP ports 135 and 5000-5020, but I still received the

same error messages.

Errors:

An error occurred while attempting to access the

SSO database.

Function: GetGlobalInfo

File: infocache.cpp:1355

Timeout expired. The timeout period elapsed

prior to completion of the operation or the server

is not responding.

SQL Error code: 0xFFFFFFFE

Error code: 0xC0002A21, An error occurred while

attempting to access the SSO database.


An error occurred while attempting to access the

SSO database.

Function: GetDeletedMappings

File: credentialcache.cpp:968

A transport-level error has occurred when

receiving results from the server. (provider: TCP

Provider, error: 0 – The semaphore timeout period

has expired.).

SQL Error code: 0x00000079

Error code: 0xC0002A21, An error occurred while

attempting to access the SSO database.


The SSO service failed to start.

Error Code: 0x800710D9, Unable to read from or

write to the database.


Failed to contact the SSO database: Timeout

expired. The timeout period elapsed prior to

completion of the operation or the server is not

responding.

Data Source=servername;Integrated

Security=SSPI;Initial Catalog=SSODB

Error code: 0x800710D9, Unable to read from or

write to the database.

Fix:

In a last ditch effort I created a firewall rule on Server_B to open

all ports for all protocols inbound and outbound for the IP

address of Server_A. This fixed the error and Server_A can now

communicate with the Enterprise SSO service on Server_B.

Create Inbound Firewall Rule


Specify Any protocol and All ports


Specify the scope of the firewall rule. The local IP address

is the IP of the network adapter on the server being configured.

The remote IP address is the IP of the device requesting a

connection to the server being configured.


Create Outbound Firewall Rule


Specify Any protocol and All ports


How to Configure Firewall on Server 2008 for Enterprise Single Sign-On (SSO)

These firewall rules need to be created on all BizTalk servers running host instances and all

servers running the Enterprise Single Sign-On Master Secret Server.

Open the Microsoft Management Console

Start -> Run -> Type MMC


File -> Add/Remove Snap-in


Select Windows Firewall with Advanced Security then click ‘Add’


Select Local computer and click ‘Finish’ and ‘Ok’


Add Inbound Rules

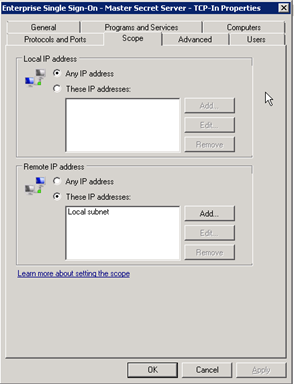
Create an inbound rule for TCP on Port 135 (Primary RPC Port)


Specify TCP protocol and port 135


Specify the scope of the firewall rule. The local IP address

is the IP of the network adapter on the server being configured.

The remote IP address is the IP of the device requesting a

connection to the server being configured.


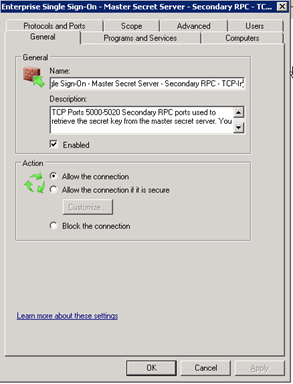
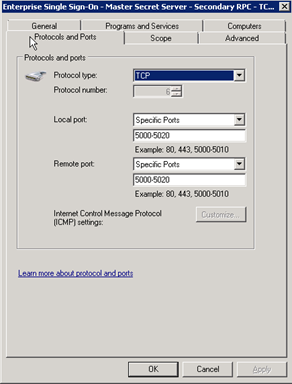
Allow Inbound TCP on Ports 5000-5020 (Default Secondary RPC Ports)


Specify TCP protocol on ports 5000-5020


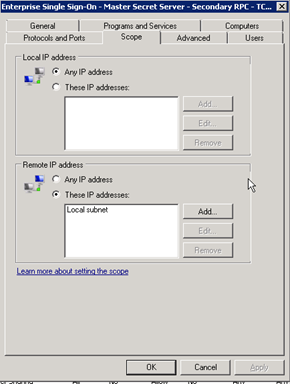
Specify the scope of the firewall rule. The local IP address

is the IP of the network adapter on the server being configured.

The remote IP address is the IP of the device requesting a

connection to the server being configured.


Add Outbound Rules

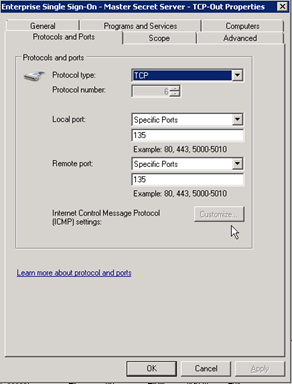
Create outbound firewall rule for TCP on Port 135 (Primary RPC Port)


Specify TCP protocol on port 135


Specify the scope of the firewall rule. The local IP address

is the IP of the network adapter on the server being configured.

The remote IP address is the IP of the device requesting a

connection to the server being configured.


Create outbound firewall rule for TCP on Ports 5000-5020 (Default RPC Ports)


Specify TCP protocol for ports 5000-5020


Specify the scope of the firewall rule. The local IP address

is the IP of the network adapter on the server being configured.

The remote IP address is the IP of the device requesting a

connection to the server being configured.

How to Configure Firewall on Server 2008 for SQL Server 2008 R2

Filed under: Firewall, Server 2008, SQL Server 2008 R2 — Tags: , , — Michael Woods @ 8:55 AM

Follow these steps to configure firewall rules that allow other computers to connect to a machine running SQL Server 2008.

Open the Microsoft Management Console

Start -> Run -> Type MMC


File -> Add/Remove Snap-in


Select Windows Firewall with Advanced Security then click ‘Add’


Select Local computer and click ‘Finish’ and ‘Ok’


Create Inbound Rules

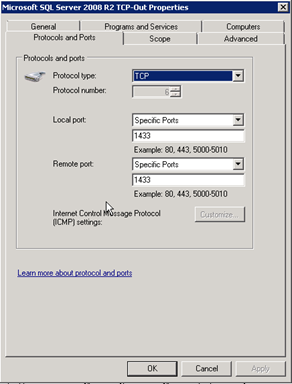
Add an inbound rule to allow TCP traffic for port 1433


Specify TCP protocol and port 1433


Specify the scope of the firewall rule


Create Outbound Rules

Create an outbound rule for TCP port 1433


Specify TCP protocol and port 1433


Specify the scope of the firewall rule

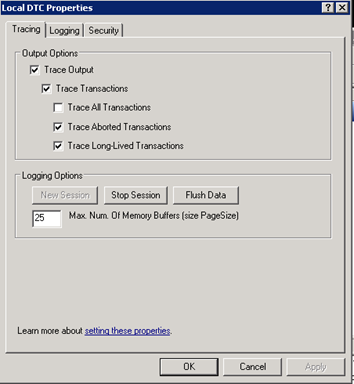
How to Configure Distributed Transaction Coordinator (DTC) on Server 2008 for BizTalk Server

Filed under: BizTalk, Network, Server 2008, SQL Server 2008 R2 — Tags: , , — Michael Woods @ 8:48 AM

This step has to be completed on all servers that will communicate with each

other for the BizTalk implementation. This includes each computer that is running

BizTalk host instances and each SQL server that BizTalk must communicate with.

Open the Microsoft Management Console

Start -> Run -> Type ‘MMC’


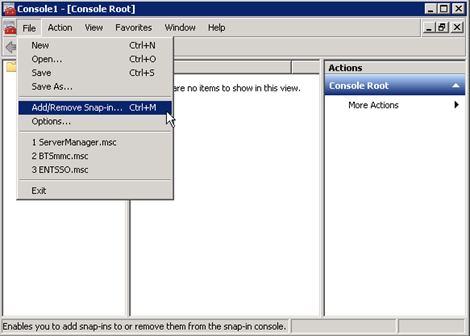
File -> Add/Remove Snap-in


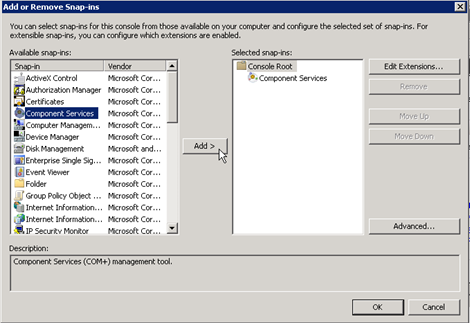
Select ‘Component Service’s. Click ‘Add’. Click ‘Ok’


Component Services -> Computers -> My Computer ->

Distributed Transaction Coordinator -> Local DTC -> (Right Click -> Properties)


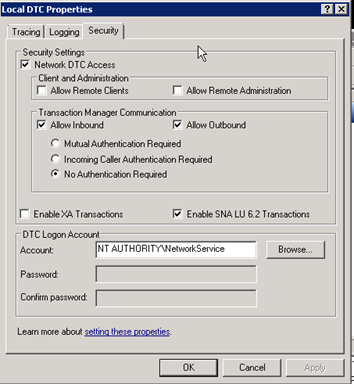
Make sure the ‘Allow Inbound’, ‘Allow Outbound’, and

‘No Authentication Required’ options are selected. Click ‘Ok’


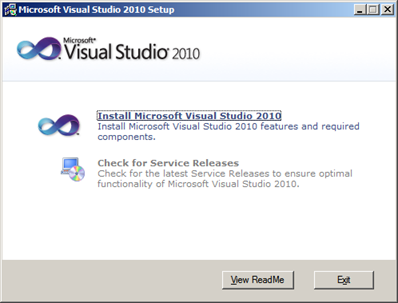
How to Install Visual Studio 2010

Filed under: .NET, Visual Studio — Tags: , , — Michael Woods @ 8:41 AM

Click ‘Install Microsoft Visual Studio 2010’


Click ‘Next’


Select ‘I have read and accept the license terms’ then click ‘Next’


Select components to be installed. Make sure not to install SQL Server 2008 Express

because it doesn’t support all of the features necessary to run BizTalk Server. SQL

Server installation will be covered in a later post. Click ‘Install’


You will see a dialog showing the progress of the installation


Make sure to install the latest patches using Microsoft Update then click ‘Finish’


Older Posts »

Create a free website or blog at WordPress.com.